yamato (Gigabyte Brix BSi5T-6200)


Summary
A tiny machine with a thunderbolt port.
Notes
- Thunderbolt and Mini DisplayPort are dead
- Hates my Samsung M7 EDID. Just returns an empty EDID when connected to it. Maybe I should test with wing (same generation graphics), TODO.
Hardware
| Make | Gigabyte |
| Year | 2016 |
| Model | GB-BSi5T-6200 |
| Chassis | Gigabyte Brix |
| Power Supply | 19V 4.74A (I'm using a 20V 3A USB C supply with barrel adapter) |
| Processor | Intel Core i5-6200U |
| Memory | 8GB DDR4 2400 Crucial CT4G4SFS824A.C8FBD2 |
| Ports | 4x USB A 3.0 |
| HDMI 2.0 | |
| 3.5mm Headphone | |
| 3.5mm Microphone | |
| RJ-45 LAN | |
| SD card slot | |
| Graphics | Intel HD Graphics 520 |
| Storage | 128GB Freenove SATA SSD |
| Int. Peripherals | Intel i219V Gigabit LAN |
| Intel Dual Band Wireless AC 3165 | |
| Realtek ALC255 Audio | |
| Ext. Peripherals | Akitio Thunder2 PCIe Box |
| Dimensions | |
| Length/Depth | 11.2 cm |
| Width | 11.9 cm |
| Height/Thickness | 3.4 cm |
| Weight | 0.41 kg (14.4 oz) |
Software
| Operating System | Debian |
| Unique applications |
Log
Enabling Thunderbolt
The GB-BSi5T-6200 was post-production thunderbolt certified. In order to enable it you need to:
- Update the BIOS
- Install the thunderbolt driver
- Run the thunderbolt firmware update
- Update BIOS
My unit came with version F1 BIOS. The only available BIOS I could find from Gigabyte was the F10 BIOS. You'll need it, and the AMI utility, but you won't actually find the AMI utility on their download page. Instead they give you a zip file containing a text file with the URL https://www.ami.com/resources/support-other/ where you need to download "Aptio V Firmware Update Utility" (direct link may not work).
Now you can follow the F10 BIOS update guide: "Update BIOS SOP R01_20200518.pdf". The general procedure is (Follow at your own risk, Read the Gigabyte guide first to familiarize yourself with the procedure):
- Copy
FLASH.NSH,image.bin, andAfuEfix64.efito a FAT formatted flash drive. - Boot to BIOS. Under the "Save & Exit" tab, enable "Me FW Image Re-Flash".
- From the BIOS screen use Boot Override to select "Built-In EFI Shell"
- Select your USB stick (type fs0:), the shell should have displayed it's name in the "Device mapping table"
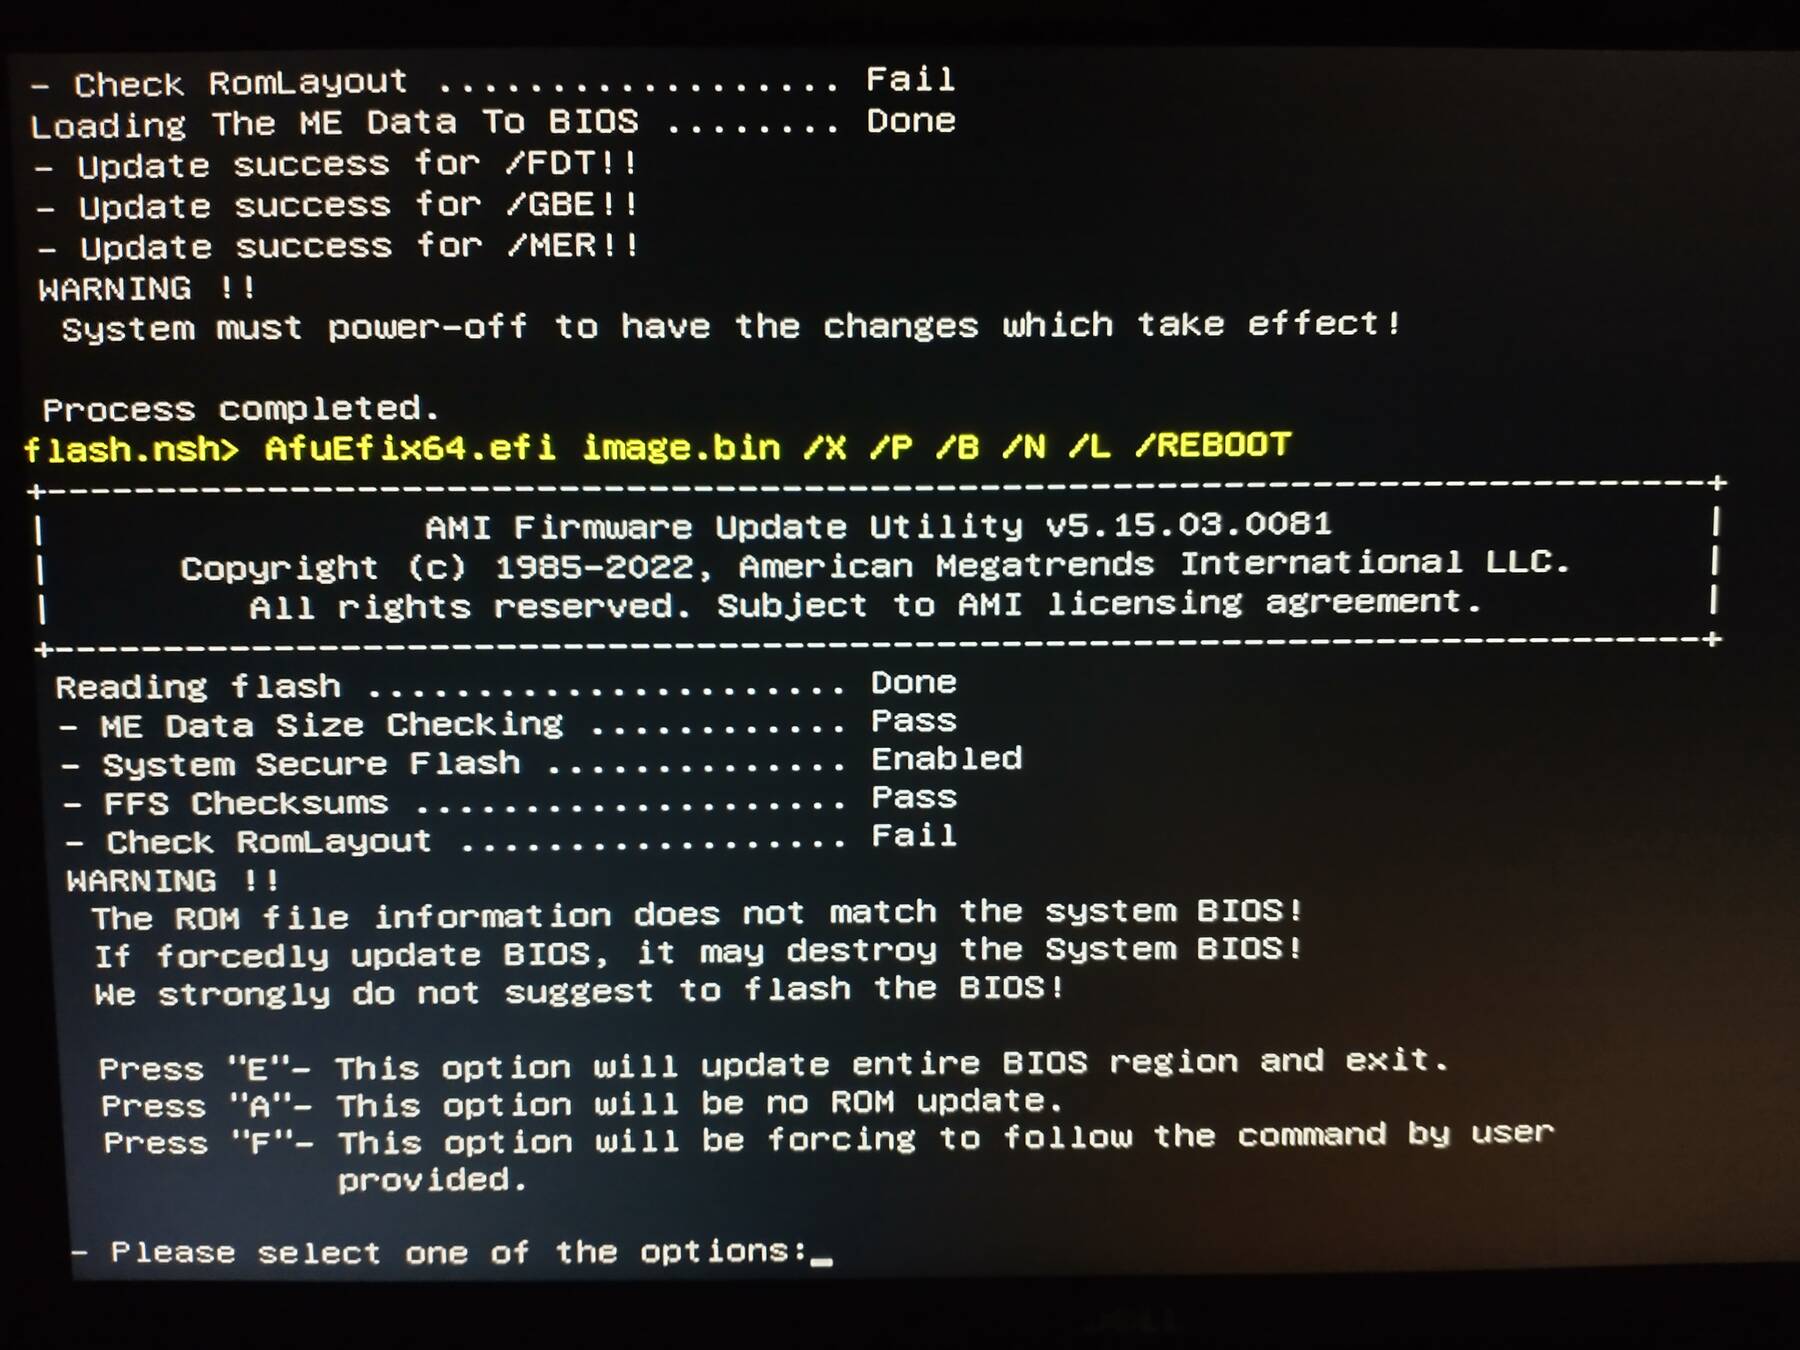
- run
FLASH.NSH - When it fails the "Check RomLayout" portion it will prompt you to take action, and show a very scary message. At this point the utility has already updated the ME firmware, and you DO NOT want to back out. The correct choice is "E" to update the entire region.
Now you can reboot. Verify your version in BIOS and check settings. If your network card MAC got clobbered you'll see FF-FF-FF-FF-FF-FF in the BIOS for "LAN MAC Address", see my next entry on how to fix that.
- Copy
- Enable Thunderbolt
Now following along instructions from the Thunderbolt Enable Package. In the new BIOS you should have an option for "Thunderbolt FW update" under
Advanced\Intel Thunderbolt. Enable that.Boot into windows, install the Thunderbolt driver.
Run the
FwUpdateTool.exefrom the Thunderbolt Enable Package. You have to manually select the includedMKLP7BP_rev16.binfirmware file.Gigabyte then says to power down the machine and remove power for a bit. Go back into BIOS and disable the "Thunderbolt FW update". Boot back up and test things.
If all went well you now have a thunderbolt capable type C port. It should work fine in Linux.
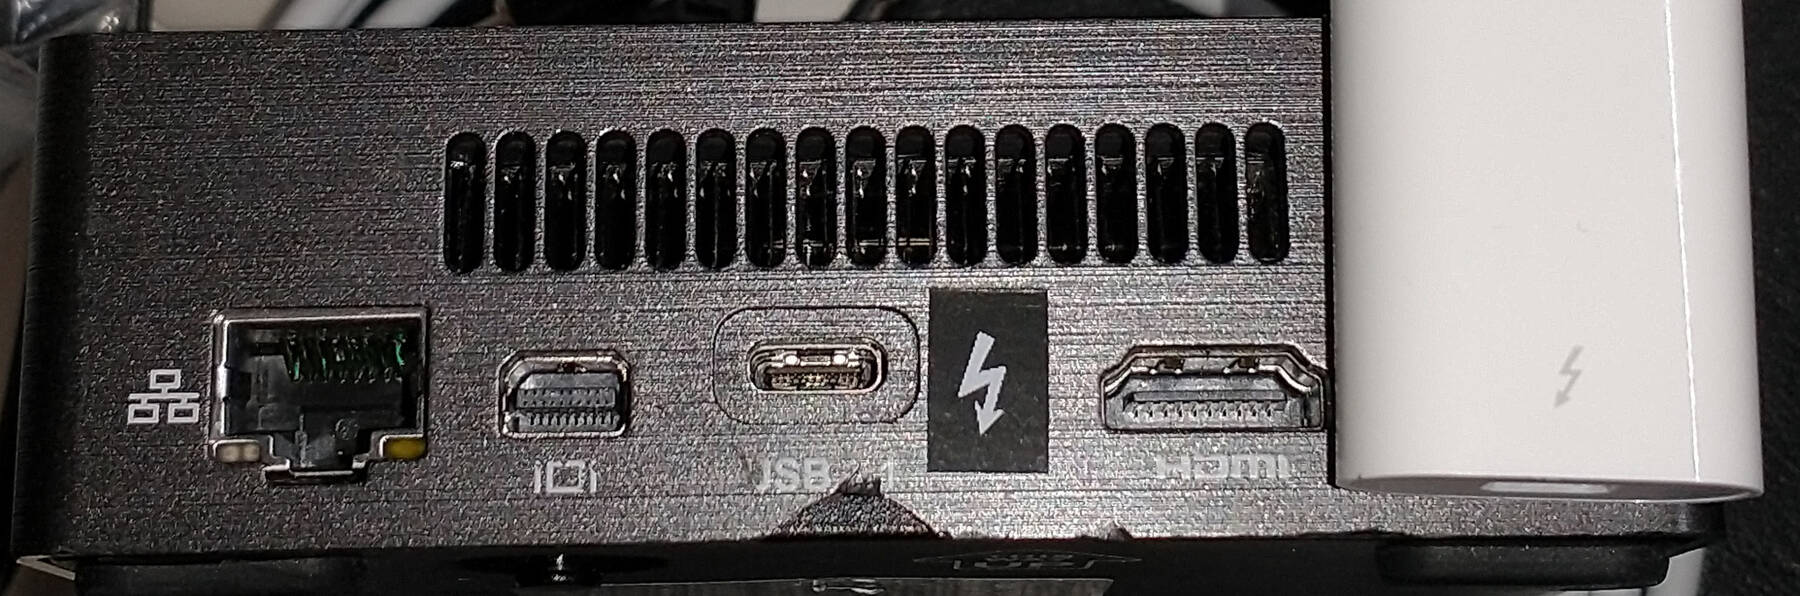
Figure 1: makeshift thunderbolt logo
Fixing a lost MAC address (I219-LM)
As part of the updates to enable thunderbolt support the Intel NIC lost it's MAC address. I suspect backing out of the update process when it said "it may destroy the System BIOS" left it in a bad state. Reflashing the BIOS had no effect.
In any case Intel didn't offer any information about fixing their NIC, except a few mentions on their forums about a secret tool. I contacted Gigabyte support, but their only offer was to send it in to (maybe) be reprogrammed at my expense.
After some poking around I found mentions of the eeupdate.exe utility, but Intel punts to the board manufacturer who punt back to Intel on actually making it available.
Eventually I found a link to a dropbox ChangeMac.zip in a thread about Asus boards. Within is a eeupdate.exe for use with I219-KB that I went ahead and used with my I219-LM. I guess do so at your own risk, but my options were a useless NIC, or a dead NIC so there wasn't much to lose by trying. The original MAC address can be found on a sticker on the ethernet port inside the chassis.
There's a nice step-by-step video in that thread, but the gist of it is boot a DOS usb stick, and run the correct eeupdate.exe with the new MAC (in place of the Xs) like so:
eeupdate /nic=1 /mac=XXXXXXXXXXXX
The thunderbolt port died
I forgot to log it, but at some point I was trying to do Thunderbolt things between this and my Thinkpad X280. Anyway I mistakenly used a non-Thunderbolt cable. Lots of swapping cables and replugging things ensued because it didn't work (obviously). At some point the Thunderbolt 3 port just died. It took the Mini DisplayPort with it.
Yamato has since been relegated to media server duty. It has a 5TB USB drive attached. It runs Jellyfin in a container. There are some future plans:
- get Plex back up and running in a container
- run a custom TV channel for broadcasting with my QAM modulator
Some docker stuff
I got around to setting up a few services on Yamato. In addition to the Jellyfin container, it now has a Plex, and Home Assistant container setup.
Home Assistant was done with an eye towards having it interface with home security cameras. Some of those are going to be PoE attached devices, but I also want to set up hostapd to connect my Wyze/Dafang Hacks cameras.
Trying to set up hostapd (and failing)
This should probably be ignored, just for reference if I decide to work within the limits of hostapd/iwlwifi in the future.
This was my experiment in trying hostapd. Due to some limitations I gave up on this, and opted for an external mikrotik AP with a USB ethernet dongle. The main issues were:
- clients would not connect when the SSID was hidden (ignore_broadcast_ssid)
- automatic channel selection (ACS) always failed
iwlwifidoesn't seem to allow for 5GHz AP due to regulatory limitations set up in the kernel driver (this might be the cause of ACS failure, but I gave up before testing)
The cameras I wanted to connect are 2.4GHz only at the moment, so that isn't a total showstopper. Anyway here's how far I got:
- Grab the necessary tools
sudo apt install hostapd wireless-tools
- Find your wifi device:
sudo iwconfig 2>&1 |grep -v "no wireless"
wlp7s0 IEEE 802.11 ESSID:off/any Mode:Managed Access Point: Not-Associated Tx-Power=-2147483648 dBm Retry short limit:7 RTS thr:off Fragment thr:off Encryption key:off Power Management:on - hostapd config
Copy an example config from
/usr/share/doc/hostapd/examples/to/etc/hostapd/hostapd.conf.Some tips taken from: https://www.cyberciti.biz/faq/debian-ubuntu-linux-setting-wireless-access-point/
Here's a run-down of things I changed:
- change interface to the wifi device
- designate an SSID
- set country
- set hw_mode for any band 802.11ac
- enable auto channel selection (failed
- hardcoded to 1 for now)
- default deny MAC acl
- hide the SSID (not working
- reverted)
- enable 802.11ac
- enable wpa2
- password
- key management to WPA-PSK
- enable CCMP pairwise cipher
Some proper auth would be nice, but I'm just doing an approved MAC list, hidden SSID, and WPA2 password.
I couldn't get ACS (auto channel selection) to work. Just picked channel 1 for testing.
Listing 1: /etc/hostapd/hostapd.confinterface=wlp7s0 ssid=yamato country_code=US hw_mode=any channel=1 # Bad, designating channel instead of ACS macaddr_acl=1 accept_mac_file=/etc/hostapd/mac.accept ignore_broadcast_ssid=0 # Bad, clients don't want to connect to hidden SSID ieee80211ac=1 wpa=2 wpa_passphrase=<passphrase> wpa_key_mgmt=WPA-PSK rsn_pairwise=CCMP
Add some macs to the accept file:
Listing 2: /etc/hostapd/mac.acceptFA:KE:MA:CA:DD:RS CO:FF:EE:PL:EA:SE
- Start it up
sudo systemctl enable hostapd
sudo systemctl start hostapd
- Maybe things are working at this point, lets try DHCP
Following https://wiki.debian.org/DHCP_Server
sudo apt install isc-dhcp-server
Give your interface an address
Listing 3: /etc/network/interfacesauto wlp7s0 iface wlp7s0 inet static address 10.20.0.1 netmask 255.255.255.0 broadcast 10.20.0.255Put your interface in the dhcp config
Listing 4: /etc/default/isc-dhcp-serverINTERFACESv4="wlp7s0"
Configure some subnets
Listing 5: /etc/dhcp/dhcpd.confoption domain-name "yamato"; subnet 10.20.0.0 netmask 255.255.255.0 { range 10.20.0.2 10.20.0.254 } - Enough
If your client is connecting you can verify with:
sudo iw dev wlp7s0 station dump
After all that we have a working access point.
It is not hidden. It is not doing channel configuration properly. My clients are only connecting on 2.4GHz.
We are getting IPs, and are able to do traffic to services on yamato. A fun experiment, but not probably not worth doing.
An NTP server
I wanted an NTP server to keep the security cam times in sync. When I went to get one I saw that Debian has seemingly dropped ntp in favor of ntpsec. Running an ntpsec server requires a certificate which requires a FQDN (Fully Qualified Domain Name). I don't have that.
In comes openntpd. To configure it you just modify /etc/openntpd/ntpd.conf, and add an address for the daemon to listen on. I went with * as I don't think there's any downside to having a server on the other networks. After restarting the openntpd service I could query it from another host with ntpdate like:
sudo /usr/sbin/ntpdate -q yamato.domain
It should respond with a timestamp and some offsets. If you get "ntpdig: no eligible servers" then it couldn't reach the server. I think a message like "leap not in sync" means the server needs more time to properly synchonize.