DreamColor USB LED Strip Light
I gave up on this device. I just did not find the benefit of the bias lighting that helpful. The color cueing (different colors at specific times, see scheduling) was a little helpful in time management, but just not that essential for me.
I was using this device bought on amazon for bias lighting of my monitor. Intended use was for lighting changes to help enforce a daily schedule.
It appears to be a micro running some Adalight firmware with a CH341A chip to talk to it.
Physical Install
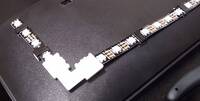
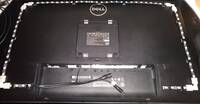
I used some right angle LED tape adapters and small adhesive clips for securing the tape behind my monitor. The right angle adapters pin pitch was not correct for the tape I got so they ended up being soldered. A couple zip ties hold the cable tails up so the tape cannot be pulled. The USB controller box was also attached to the monitor rear with double stick foam tape.
It's important to count the number of LEDs on each side/segment if you intend to do any color matching with your display. At a minimum I think you need a total count for configuration.
Windows test
Tried a windows machine with Ambibox app. The 3M 60 leds/M variety I bought has 180 leds. I used the Adalight device type and had to go into device manager to check the com port (click more settings to get the extra com port drop down). Couldn't get all the LEDs to light in any of the capture modes, but they did light fully in static. Good enough to test it.
psieg/Lightpack should also run on Windows, but I haven't tried it.
psieg/Lightpack
The psieg/Lightpack fork is more up to date than the woodenshark/Lightpack repo I tried first. It also has some extra features.
I made these changes to compile, but the maintainer didn't seem to hit issues with them so your mileage may vary:
--- a/Software/src/MoodLamp.hpp
+++ b/Software/src/MoodLamp.hpp
@@ -47,7 +47,7 @@ public:
        MoodLampBase() { init(); };
        virtual ~MoodLampBase() = default;

-       static const char* const name() { return "NO_NAME"; };
+       static std::string name() { return "NO_NAME"; };
        static MoodLampBase* create() { Q_ASSERT_X(false, "MoodLampBase::create()", "not implemented"); return nullptr; };
        static MoodLampBase* createWithID(const int id);
        static void populateNameList(QList<MoodLampLampInfo>& list, int& recommended);
--- a/Software/src/wizard/GlobalColorCoefPage.cpp
+++ b/Software/src/wizard/GlobalColorCoefPage.cpp
@@ -56,8 +56,6 @@ void GlobalColorCoefPage::initializePage()

        _screenId = field("screenId").toInt();

-       QRect s = QApplication::desktop()->screenGeometry(_screenId);
-
        int screenCount = QApplication::desktop()->screenCount();
        for (int i = 0; i < screenCount; i++) {
                QRect geom = QApplication::desktop()->screenGeometry(i);
The included udev rules are not appropriate for my device. I used:
# bias lighting thing I bought on amazon
SUBSYSTEM=="tty", ENV{ID_VENDOR_ID}=="1a86", ENV{ID_MODEL_ID}=="7523", GROUP="plugdev", MODE="0666"
Adjust to suit your device id and preferred group. After that run the Software/src/bin/Prismatik binary and you should be able to do it's configuration.
Screen capture is limited to a single display, but you can pick which one. Not sure if you can run multiple sets. There are also color changing and static modes. Pretty much just works after setup.
Prismatik (GUI control app)
Configuration is straightforward select 'Adalight' and adjust LED count to your custom lengths.
Bash completion for command line control
I copied from a umount example with the escaping spaces found on stackexchange.
_prismatik_module()
{
        local cur prev OPTS
    _init_completion || return

        case $prev in
                '--set-profile')
                        local PROFILES
            IFS=$'\n' PROFILES="$(\ls ~/.Prismatik/Profiles | sed -e 's/\.ini$//')"
            IFS=$'\n' COMPREPLY1=( $(compgen -W "$PROFILES" -- $cur))
            COMPREPLY2=( "${COMPREPLY1[@]// /\ }" )
            COMPREPLY=($(printf "%q\n" "${COMPREPLY2[@]}"))
                        return 0
                        ;;
                '-h'|'--help'|'-V'|'--version')
                        return 0
                        ;;
                '--debug')
                        local DEBUG
                        DEBUG="
                 high
                 mid
                 low
                 zero"
                        COMPREPLY=( $(compgen -W "$DEBUG" -- $cur) )
                        return 0
                        ;;
        esac
        case $cur in
                -*)
                        OPTS="
                --version
                                --help
                                --nogui
                                --wizard
                                --off
                                --on
                                --debug
                                --debug-high
                                --debug-mid
                                --debug-low
                                --set-profile"
                        COMPREPLY=( $(compgen -W "${OPTS[*]}" -- $cur) )
                        return 0
                        ;;
        esac
}
complete -F _prismatik_module Prismatik
Scheduling lighting with cron
The --on command is issued twice because it doesn't always work. Too lazy for a proper fix.
DISPLAY=:0
0 5 * * 1-5 /home/username/.local/bin/Prismatik --set-profile Green >/dev/null 2>&1; /home/username/.local/bin/Prismatik --on >/dev/null 2>&1; /home/username/.local/bin/Prismatik --on >/dev/null 2>&1
0 6 * * 1-5 /home/username/.local/bin/Prismatik --off >/dev/null 2>&1; /home/username/.local/bin/Prismatik --off >/dev/null 2>&1
30 8 * * 1-5 /home/username/.local/bin/Prismatik --set-profile Green >/dev/null 2>&1; /home/username/.local/bin/Prismatik --on >/dev/null 2>&1; /home/username/.local/bin/Prismatik --on >/dev/null 2>&1
0 9 * * 1-5 /home/username/.local/bin/Prismatik --set-profile Red >/dev/null 2>&1; /home/username/.local/bin/Prismatik --on >/dev/null 2>&1; /home/username/.local/bin/Prismatik --on >/dev/null 2>&1
0 12 * * 1-5 /home/username/.local/bin/Prismatik --set-profile Green >/dev/null 2>&1; /home/username/.local/bin/Prismatik --on >/dev/null 2>&1; /home/username/.local/bin/Prismatik --on >/dev/null 2>&1;
0 13 * * 1-5 /home/username/.local/bin/Prismatik --set-profile Red >/dev/null 2>&1; /home/username/.local/bin/Prismatik --on >/dev/null 2>&1; /home/username/.local/bin/Prismatik --on >/dev/null 2>&1;
0 17 * * 1-5 /home/username/.local/bin/Prismatik --set-profile Blue >/dev/null 2>&1; /home/username/.local/bin/Prismatik --on >/dev/null 2>&1; /home/username/.local/bin/Prismatik --on >/dev/null 2>&1;
0 21 * * 1-5 /home/username/.local/bin/Prismatik --off >/dev/null 2>&1; /home/username/.local/bin/Prismatik --off >/dev/null 2>&1


